"Sit" is one of the most basic commands in dog training. Mastering it can help prevent jumping and excessive barking, and improve safety. This article provides a clear, third-party perspective on "5 steps to teaching your dog to sit," which is easy for beginners to follow. It covers everything from necessary preparations to teaching tips and what to do if things don't go well. This article will be a helpful reference for deepening your bond with your dog and making training fun.
Why teaching sit matters for every dog
Teaching sit is one of the most important skills for every dog, from tiny puppies to seniors. A solid sit becomes a simple way to ask a dog to pause, focus, and control their body. Because the movement is natural and comfortable, dogs usually learn it quickly and gain confidence from success. Sit also becomes the foundation for many other cues such as stay, down, and polite greetings. By investing a little time in sit training, owners gain a safe, clear way to communicate in daily life.
Benefits for your dog’s safety and manners
A reliable sit command greatly improves safety. A dog that sits on cue can be stopped at curbs, before crossing roads, or when bicycles and cars pass. Sit also prevents jumping on people, reducing the risk of falls for children and the elderly. In daily life, sit becomes the foundation for good manners: waiting calmly for food, grooming, or the leash. Because the behavior is simple and clear, many dogs gain confidence and self‑control by practicing sit regularly.
When to start and how long training should last
Puppies can begin learning sit from around 8 weeks of age, using very short, gentle sessions. Adult or rescue dogs may start at any time, beginning in a quiet room to reduce confusion. One session should last 3–5 minutes, repeated 2–5 times a day. Frequent, short practices help dogs stay focused and prevent frustration. End each session on an easy success so the dog looks forward to the next training time.
What you need before you start training

Before starting sit training, it is helpful to prepare a few basics. First, choose soft, bite‑sized treats your dog loves, so rewards can be eaten quickly. Prepare a flat collar or harness and a light leash for safety and guidance, not for pulling. Pick a quiet, distraction‑free space such as a living room. Decide on a clear cue word like “sit” and ensure all family members use the same word and rules so the dog receives consistent signals.
Choosing the right treats and rewards
Rewards are the engine of sit training. The ideal treat is small, soft, and very tasty so a dog can eat it quickly and stay focused. Boiled chicken, cheese, or commercial training treats cut into pea-sized pieces work well. For very food‑motivated dogs, kibble may be enough in quiet environments.
Not all dogs value food the most. Many respond strongly to play, praise, or access to something they want (for example, going out the door). Combining a tiny treat with warm verbal praise helps many dogs learn faster and keeps motivation high without overfeeding.
Clicker, marker word, and timing basics
A clicker or marker word tells the dog the exact moment it did something right. A clicker makes a sharp, consistent sound, while a marker word is a short word such as “Yes!” or “Good!” said in a happy tone. First, pair the marker with rewards: click or say the word, then give a treat, many times. After a few repetitions, the dog understands that marker = reward coming, so timing becomes very clear and training progresses faster.
Setting up a calm training environment
A calm environment helps the dog focus and learn faster. Choose a quiet, familiar room away from doors, windows, and busy walkways. Turn off loud TV or music, and keep children and other pets out during practice. Use a non‑slip floor or mat so the dog feels secure when sitting. Prepare treats and clicker or marker word beforehand to avoid fumbling. Short sessions in a peaceful space build positive, low‑stress associations with training.
How to teach a dog to sit step by step
Teaching a sit is easiest when broken into clear, simple actions. The flow is: attract attention → guide the body → name the action → reward → repeat briefly. Each step builds on the previous one, so it is important not to rush ahead. Short, positive sessions help the dog stay motivated and prevent frustration. In the following steps, owners learn how to use a food lure, add the “sit” cue, and gradually shape a calm, reliable behavior.
Step 1: Get your dog’s attention
Before any sit training, the dog needs to focus on the handler. Call the dog’s name once in a calm voice and wait for eye contact or the dog turning toward the handler. The moment attention comes, mark and reward with a treat or praise. If the dog is distracted, move to a quieter spot, use a higher‑value treat, or briefly play with a toy. Consistently rewarding attention teaches the dog that staying tuned in is worthwhile, which makes all later sit steps smoother and faster.
Step 2: Lure your dog into the sit
Hold a soft, small treat right at your dog’s nose, then slowly move your hand up and slightly back over the head. Most dogs naturally lower the rear to follow the treat. The moment the bottom touches the ground, mark with a click or “Yes!” and give the treat. Keep the dog’s front paws still by moving the hand in a smooth arc, not too high or fast. If the dog jumps up, lower the hand closer to the nose and try a smaller, calmer movement.
Step 3: Add the verbal sit cue
Once the dog is smoothly following the treat into a sit, a clear verbal cue can be introduced. Say “Sit” once, in a calm voice, just before moving the hand with the treat upward and slightly back over the dog’s head. The moment the dog’s bottom touches the ground, mark with a click or a marker word such as “Yes!” and then give the treat. Repeating this sequence helps the dog learn that the word “Sit” predicts the sitting action and a reward, rather than responding only to the hand movement.
Step 4: Reward quickly and consistently
Rewarding at the correct moment helps the dog understand exactly which behavior earns a payoff. Give the treat within 1–2 seconds of the dog’s rear touching the ground, right after the marker word or click. At first, reward every single sit to build a clear association. Use small, high-value treats to avoid overfeeding and keep motivation high. Once the behavior becomes reliable, gradually move to rewarding most sits, then randomly, while still praising every time.
Step 5: Practice short, frequent sessions
Short, frequent sessions help dogs learn faster and stay motivated. Aim for 3–5 minute sessions, several times a day, rather than one long practice. Stop before the dog loses focus so training ends on a success. Alternate sit training with play or rest, and avoid drilling too many repetitions in a row. Regular, bite-sized practice in daily life builds a strong habit without causing boredom or frustration for either owner or dog.
Training how to teach a dog to sit reliably
To make sit truly reliable, the dog needs to respond anytime, anywhere, not only in quiet practice. First, ensure the cue is clear: one calm “sit,” then wait. If the dog does not respond, reduce distractions and help with a small hand signal. Gradually increase difficulty: different rooms, garden, then quiet public areas. Always reward correct responses, especially when the environment becomes harder, so the dog learns that listening pays off in every situation.
Fading food lures and using life rewards
Food lures are useful at the start, but should be phased out so the dog does not only sit when seeing a treat. First, move the treat to the other hand and use the same hand motion without food. Reward from the other hand after the sit. Next, reward only every second or third sit, while still praising every correct response.
Begin to use “life rewards”: opening the door, putting the bowl down, clipping the leash, or starting play all happen after a sit. The dog learns that polite behavior, not visible food, makes good things happen.
Building duration so your dog stays sitting
To build duration, increase sitting time very gradually. First, reward after 1 second, then 2–3 seconds, then 5 seconds, always before the dog chooses to stand. If the dog pops up, duration was too long, so shorten the time again. Vary the timing so the dog does not predict the exact moment of reward. Calm praise, a relaxed body, and occasional jackpot treats for longer sits help the dog learn that staying seated is worthwhile and relaxing.
Generalizing sit in new places and times
To make “sit” truly reliable, a dog needs practice in many locations, with different people, and at different times of day. Start in a quiet room, then gradually move to the yard, sidewalk, and busy areas. Keep criteria easy at first: accept quick, short sits in new places and reward generously. Change variables one by one: location, distance from the owner, distractions, then time of day. Consistent success in varied situations creates a dog that sits automatically, not only in the living room.
Using sit in everyday life situations

A well‑trained sit becomes most useful when it is woven into daily routines. Using sit as a “pause button” helps dogs stay calm and polite in many situations. For example, sit before doors open, before putting the leash on, or before getting in and out of the car. Sit can also be requested when guests arrive, at the vet, or when passing other dogs on walks. Repeating the cue in real life strengthens the habit so the dog chooses to sit automatically in everyday life.
Sit before meals, walks, and doorways
A simple “sit first” rule makes daily life calmer and safer. Ask for sit before meals, walks, and going through doors. Before feeding, hold the bowl, say “sit,” then lower the bowl only when the bottom touches the floor. Before walks, clip the lead, ask for sit, then open the door and step out only if your dog remains seated. At doorways, use sit to prevent rushing outside or knocking people over. Over time, sit becomes a natural pause that helps your dog think before acting.
Sit to greet people instead of jumping
Many dogs jump to say hello, but people often find it uncomfortable or unsafe. Teaching a polite sit gives dogs a clear way to greet. Before someone approaches, calmly ask for “sit”, then reward as the person comes closer. If paws leave the floor, the person pauses or turns away; when the dog sits again, greeting continues. The dog soon learns “bottom on ground makes people come closer, jumping makes them go away.” For children or elderly visitors, a leash or baby gate adds extra safety.
Sit as a calm alternative to bad habits
Many common problem behaviors come from excess energy and unclear expectations. Teaching sit gives dogs a simple, calm behavior to do instead of unwanted habits. When a dog learns that sitting makes good things happen, they are less likely to bark, pace, demand attention, or grab at objects. Use sit as a default: before jumping on the sofa, before begging at the table, or when whining. Over time, the habit of sitting helps the dog relax and makes everyday life much easier.
Puppies vs adult dogs: what changes

Puppies and adult dogs can both learn to sit, but the training approach changes slightly. Puppies have short attention spans and tire quickly, so sessions need to be very short, playful, and focused on gentle guidance. Adult dogs often concentrate better but may have strong existing habits or past experiences that slow learning. Joint health must also be considered for seniors. In every case, use positive reinforcement, clear cues, and realistic expectations for the dog’s age and body.
Special tips for teaching young puppies
Young puppies tire and distract easily, so very short lessons are important. Aim for 1–2 minute sessions, several times a day, when the puppy is calm and not too hungry or full. Use soft, tiny treats that are easy to swallow and a cheerful voice. Reward any small effort toward a sit, not only perfect form. Avoid training on slippery floors so the puppy feels safe. Finish every session on a success and offer a quick game or cuddle so training feels fun.
Helping rescue or older dogs learn sit
Rescue dogs and senior dogs may have difficulty learning to sit immediately due to past experiences and physical pain. First and foremost, it is important to help them feel that their new home is a safe and quiet place. Practice for short periods on a soft floor and praise them enthusiastically when they do it. If you are concerned about the strain on their joints, it is a good idea to consult your veterinarian and consider teaching them to sit lower or to lie down instead.
Common problems when teaching sit

Many owners encounter similar setbacks when teaching sit. Most issues come from unclear cues, moving too fast, or training in distracting environments. Dogs may appear stubborn, but usually feel confused, overexcited, or physically uncomfortable.
Typical problems include not sitting at all, backing away, popping up instantly, or becoming distracted and anxious. Focusing on clear signals, appropriate rewards, very short sessions, and a quiet space often resolves difficulties and helps both owner and dog relax during training.
Dog won’t sit or keeps backing away
A dog that backs away usually feels confused, pressured, or unsure what is wanted. First, soften body language: turn slightly sideways, avoid leaning over, and keep movements small. Lure only a short distance over the nose; if the dog steps back, reset and try closer. Reward any tiny motion toward sitting, such as bending the back legs. Training near a wall or corner can gently limit backing up, but never trap or force. Short, easy sessions build confidence.
Dog pops up quickly and won’t hold sit
Many dogs sit when asked but immediately pop back up. In many cases the dog has not learned that “sit” means stay seated until released. First, reward only when the dog holds the sit for one or two seconds. Gradually increase duration by a second at a time, always releasing with a clear cue such as “OK” before the dog moves.
If the dog keeps jumping up for the treat, keep the reward hand close to the chest, step slightly into the dog as needed, and only move the hand toward the mouth after a stable sit. Avoid repeating the cue; say “sit” once, then wait. Short, frequent practices in low‑distraction areas help the dog understand that a calm, steady sit is what makes good things happen.
Overexcited, distracted, or anxious dogs
Dogs that are overexcited, distracted, or anxious often struggle to sit because emotions override focus. First, lower arousal: take a short walk, offer sniffing time, or use calm praise instead of hyping the dog up. Train in a quiet, low-distraction space and shorten sessions.
For anxious dogs, keep distance from triggers and pair sit with gentle rewards, not pressure. Use high-value treats for distracted dogs but ask for one simple sit at a time. If the dog cannot sit, the level of excitement or distraction is too high; move farther away or pause training until the dog relaxes.
Mistakes to avoid in sit training

Many owners stumble over similar errors when teaching sit. The most common mistake is only using food in the hand as a “bribe” and never phasing it out, which weakens the cue. Repeating “sit, sit, sit” is also confusing; say the cue once, then help the dog. Avoid long, tiring sessions, punishing slow responses, or training in busy places too early. Calm, short, success‑focused practice builds a reliable sit fastest.
Why not to push your dog’s rear down
Many people gently push a dog’s rear down to "help" with sit, but physical pressure often creates confusion and discomfort. Dogs may tense up, resist, or even develop a dislike for sit because it predicts being forced into position. In addition, pushing does not teach how to sit; the dog only learns to be moved. Luring with food or a toy allows the dog to discover the posture, which builds clearer understanding, confidence, and trust in the handler.
Avoiding bribes, nagging cues, and anger
Using food only as a payment for good behavior, not as a constant lure, prevents it from becoming a bribe. First give the cue “sit,” then reward after the behavior. If the treat appears first every time, many dogs only respond when they can see food.
Nagging cues such as “sit, sit, sit!” quickly lose meaning. Say the cue once, wait a moment, then calmly reset and try again if the dog does not respond. Clear, single cues help the dog understand faster.
Anger, shouting, or punishment during training makes dogs worried and less willing to learn. A calm voice, short sessions, and generous rewards create a trusting relationship and much more reliable sits.
Next steps after your dog masters sit
Once a dog responds smoothly to “sit,” training can move on to proofing and expanding skills. The sit cue becomes a foundation for many behaviors. Begin by practicing in different rooms, then gradually outdoors. Increase distractions slowly so the dog can succeed.
Next, owners can add hand signals, distance, and stay based on sit. Using sit before meals, walks, or greetings also keeps manners sharp in daily life and prevents problem behaviors from returning.
Adding hand signals and distance
Hand signals make communication clearer and help at a distance or in noisy places. A common signal for sit is a flat hand moving up from the dog’s nose toward the handler’s chest. First, say “sit,” then give the hand signal, then reward. After repetition, many dogs respond to the signal alone.
To add distance, start with the dog close, then take one small step back before asking for sit. Gradually increase the gap: one step, then two, then across the room or yard. Only increase distance when the dog succeeds several times in a row, and if the dog fails, move closer again rather than repeating the cue loudly.
Progressing to down, stay, and recall
Once sit is reliable, it becomes the foundation for other key cues.
Down: Ask for a sit, then lure a treat from the dog’s nose straight down between the front paws and slightly forward. Mark and reward as elbows touch the floor. Gradually add the word “down” before the lure.
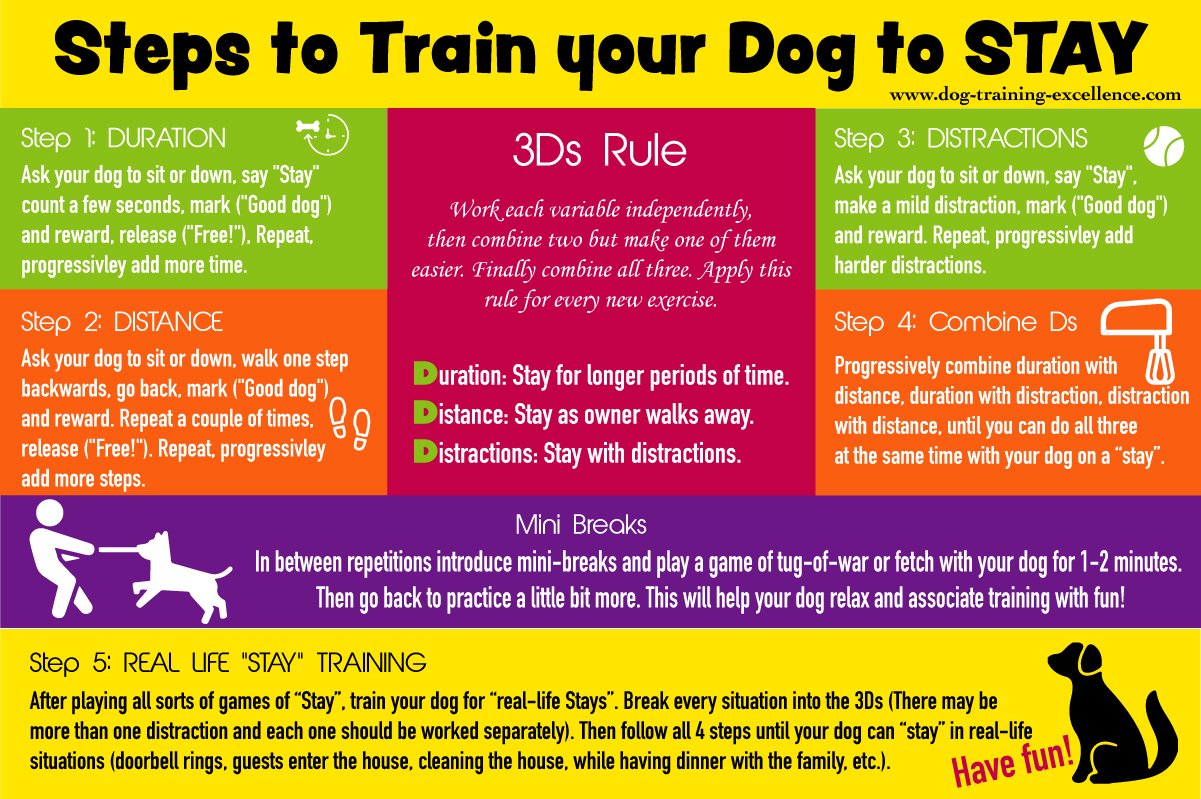
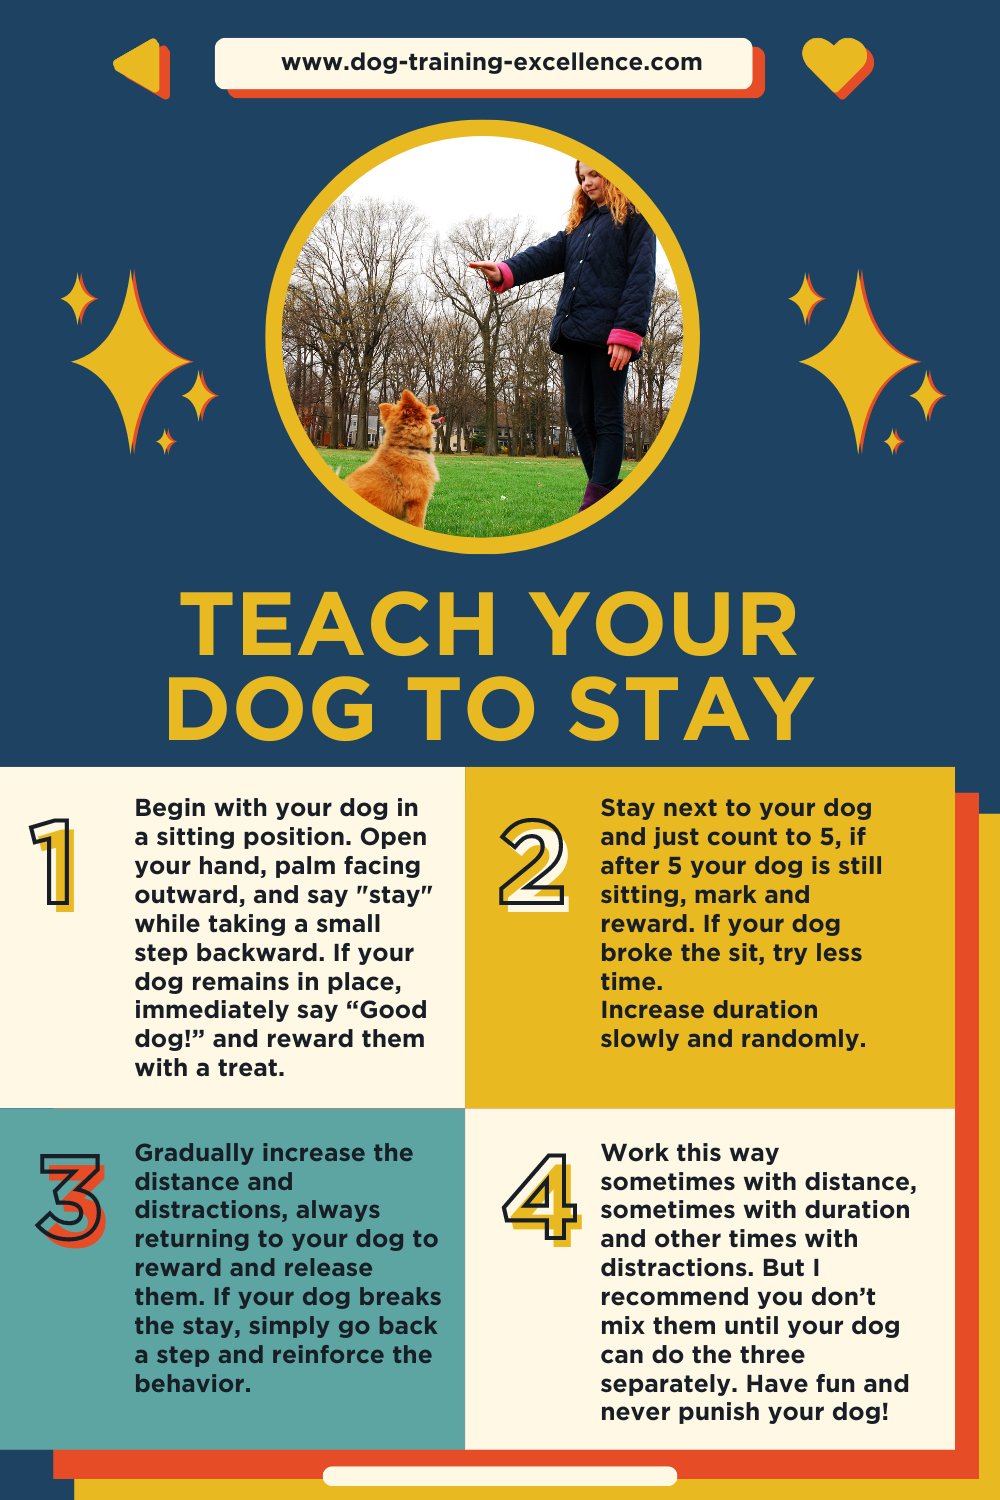
Stay: From a sit or down, say “stay,” pause one second, then reward. Slowly increase time, then add one step back, then more distance and mild distractions. Always return to the dog to reward so staying in place pays.
Recall (come): Start in a quiet area. Gently hold the dog, say the name + “come” in a happy tone, then move backward. When the dog reaches the handler, cue sit, then reward generously. Short, fun repetitions create a dog that runs happily when called.
This article provides a detailed explanation of how to teach your dog to "sit," focusing on five easy steps, while also covering the importance of safety and manners, the rewards and environment you should prepare, specific points for puppies and adult dogs, how to handle setbacks, and even examples of how to use it in daily life and the next command you should teach your dog. It's written in a way that's easy for beginners to follow.


![[Funny Dog & Cat Videos] Tips for Filming to Bring Out Their Charm and Make Your Dog Look Like That!](https://with-my-dog.com/wp-content/uploads/2022/04/3015452_s-150x150.jpg)


![[Dog Names] Is the Japanese name boom here?! Ranking of Japanese dog names!](https://with-my-dog.com/wp-content/uploads/2021/10/adtDSC_0871-150x150.jpg)


![[Recommended for males] Cool dog names](https://with-my-dog.com/wp-content/uploads/2022/07/image1-36-300x200.jpg)