
Many dog owners worry about their dog's ears if they scratch them or notice an unpleasant odor, wondering if it's an ear infection. This article focuses on "dog ear infection treatment at home," clearly explaining safe treatment methods based on veterinary practices and the signs that indicate you should seek veterinary care. We also introduce precautions to avoid worsening the condition with self-care, making this article helpful for those who want to understand what they can do at home and when they should leave it to the vet.
Why Dog Ear Infections Need Care
Dog ear infections may seem minor at first, but they can progress very quickly. The ear canal is warm, dark, and narrow, so bacteria and yeast multiply easily, causing pain and swelling. Without proper care, infection can damage the eardrum, lead to chronic ear disease, or even affect hearing and balance. Early attention reduces discomfort, shortens treatment time, and lowers costs. Prompt, gentle care at home combined with timely veterinary support protects long‑term ear health.
Common causes of ear infections
Ear infections usually start when something irritates or traps moisture in the ear canal. Common causes include:
- Allergies (food or environmental) that inflame the skin inside the ear
- Water or humidity after bathing or swimming, especially in floppy‑eared dogs
- Earwax buildup that holds debris and bacteria
- Foreign material, such as grass seeds or dirt
- Overgrowth of bacteria or yeast on already irritated skin
- Ear mites (more common in puppies or dogs from shelters)
Understanding the cause helps owners and veterinarians choose the safest treatment.
Types of ear infections in dogs
Dog ear infections mainly affect three areas. Understanding which part is inflamed helps owners judge urgency and care.
| Type | Where it occurs | Key features |
|---|---|---|
| Otitis externa | Outer ear canal | Most common; redness, smell, discharge, head shaking |
| Otitis media | Middle ear | Often spreads from outer ear; pain when opening mouth, balance changes |
| Otitis interna | Inner ear | Serious; tilted head, loss of balance, rapid eye movements |
Middle and inner ear infections always require prompt veterinary care, not home treatment.
Risk factors by breed and lifestyle
Certain dogs are simply more prone to ear infections because of ear shape, coat type, and lifestyle.
| Risk factor | Examples | Why risk increases |
|---|---|---|
| Floppy ears | Cocker Spaniel, Basset Hound | Traps warmth and moisture |
| Hairy ear canals | Poodle, Schnauzer | Holds wax and debris |
| Narrow ear canals | Bulldogs, Shar Pei | Poor airflow, harder to clean |
| Lots of swimming/bathing | Retrievers, active pets | Water left in ears encourages yeast and bacteria |
| Allergies or skin disease | Many breeds | Inflammation changes ear environment |
| Humid, hot climate | Any dog | Ears stay damp longer |
Dogs with chronic allergies, frequent grooming, or a history of ear problems benefit from more regular ear checks and gentle cleaning.
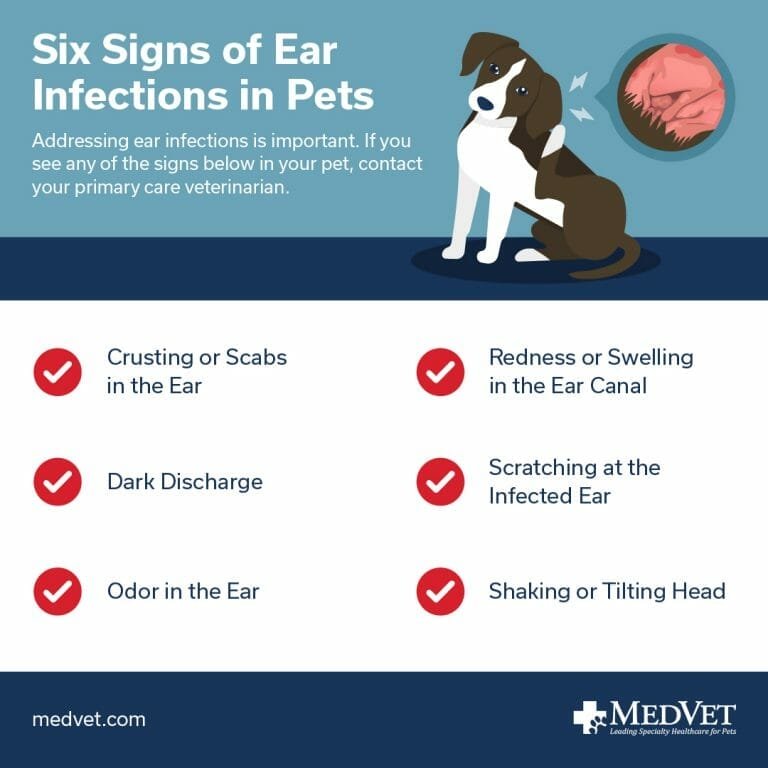
Signs Your Dog May Have an Ear Infection
Ear infections often start subtly, so many owners overlook early changes. However, spotting problems early greatly reduces pain and complications. Watch for changes in odor, color, and your dog’s behavior around the ears. Pain can build quickly, and infection may spread deeper into the ear if care is delayed. The next sections explain concrete symptoms and warning signs to help owners judge when ears need prompt attention.
Early symptoms to watch for
Early signs are often subtle, so daily observation is important. Common early symptoms include:
- More frequent head shaking or quick head tilts
- Light scratching around one or both ears
- Mild redness inside the ear flap
- A slight yeasty or "corn chip" smell from the ear
- Small amounts of yellow or brown debris
- Flinching or pulling away when the ear is touched
Noticing and responding to early changes can often prevent more painful, severe infections.
Red flag signs that mean trouble
Red flag signs suggest that the ear infection is severe or spreading and need prompt veterinary care. Warning signs include:
- Strong, foul odor from the ear
- Thick yellow, brown, or bloody discharge
- Intense redness or marked swelling of the ear canal or flap
- Constant head shaking or crying when the ear is touched
- Dog tilting the head, walking in circles, or losing balance
- Fever, lethargy, or loss of appetite
When any of these appear, home treatment alone is unsafe and a vet visit is urgent.
Ear infection or just dirty ears?
Ear canals can look dirty without being infected, so checking a few points helps. Simple wax or a little tan‑brown debris with no bad odor, no redness, and a comfortable dog often means the ears are just dirty. Infections usually cause red, swollen skin, strong smell, pain, and increased discharge that may be yellow, gray, or bloody. If a dog resists touch, cries, or keeps shaking the head, it is safer to assume infection and consult a veterinarian.
Can You Treat a Dog Ear Infection at Home?

Many dog ear infections need prescription medicine, but some very mild, early cases can be supported at home. The key is understanding limits. Home care usually means gentle cleaning, keeping ears dry, and providing comfort while monitoring symptoms. If pain, strong odor, heavy discharge, or balance problems are present, home treatment alone is not safe. Infections deep in the ear or long‑lasting problems can worsen quickly without veterinary diagnosis and targeted medication.
When home care is reasonable
Home care is reasonable only for mild, early ear problems and as a short-term measure. Typical situations are:
- Slight head shaking or occasional scratching
- Mild redness or a bit of brown wax, with no strong odor
- Dog still eating, playing, and allowing gentle ear handling
In such cases, careful cleaning with a vet‑approved ear cleaner, close observation, and prompt vet booking if signs worsen can be appropriate. Long‑term home treatment without diagnosis is not recommended.
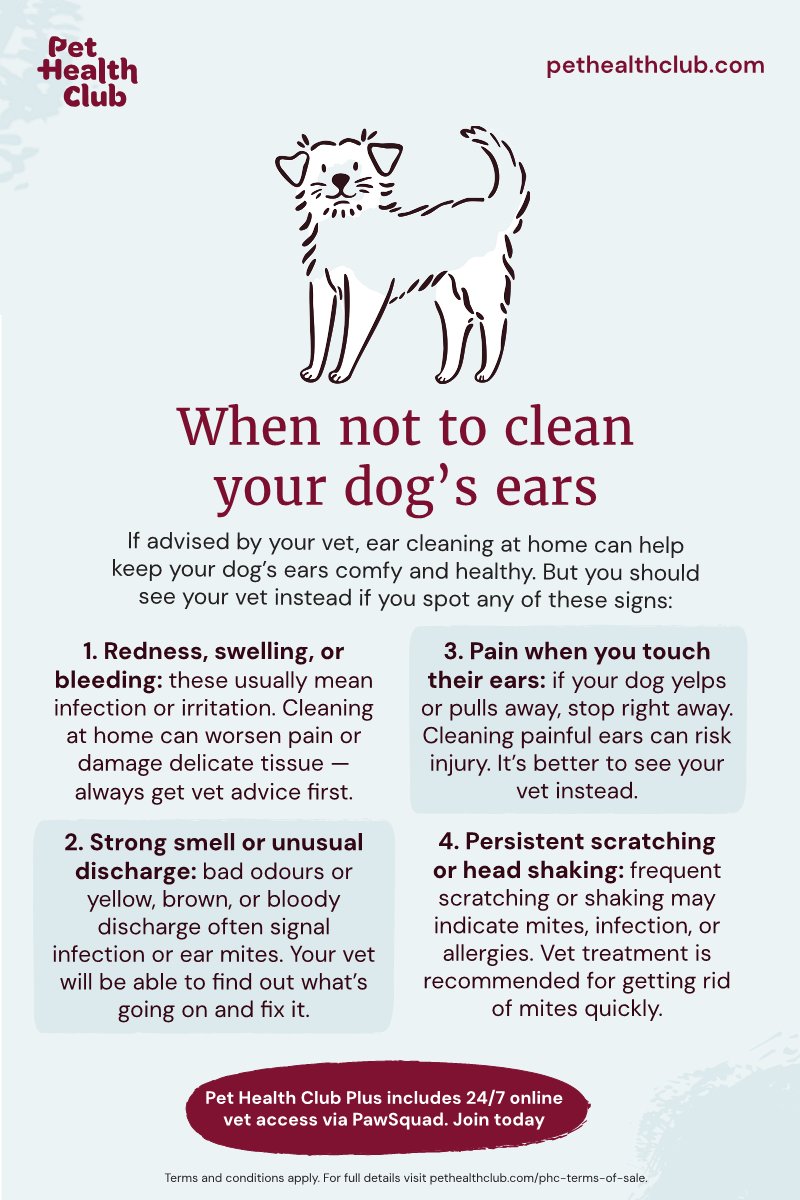
When home treatment is not safe
Home treatment is not safe when symptoms are severe or long‑lasting. Avoid at‑home care alone and contact a vet promptly if you notice:
- Strong odor, thick yellow, brown, or bloody discharge
- Intense redness, swelling, or the ear feels hot
- Very strong pain: crying, snapping, refusing touch
- Head tilt, balance problems, rapid eye movement
- Symptoms lasting more than a few days or keep coming back
In these situations, delaying professional care can quickly worsen ear damage.
Health risks of delaying vet care
Delaying veterinary care can turn a simple outer ear infection into chronic, painful disease. Infection may spread deeper into the ear, damage the eardrum, and in severe cases affect balance and hearing permanently. Stronger, longer treatment is then required. Ongoing inflammation also makes future infections more likely and may signal untreated allergies or hormonal disease elsewhere in the body.
Vet-Backed Home Care Steps

At-home care focuses on comfort, gentle cleaning, and monitoring, not replacing veterinary treatment. For many dogs, safe home steps include: keeping the ear area clean and dry, using a vet‑approved ear cleaner as directed, preventing scratching, and watching for worsening signs. Owners should stop home care and seek veterinary help immediately if pain increases, foul odor or swelling appears, or symptoms fail to improve within a short period.
Prepare a calm, safe setup
A calm environment helps a dog accept ear care more easily and prevents sudden movements. Choose a quiet room with good light and close doors to avoid distractions. Prepare what is needed in advance: ear cleaner, cotton pads or gauze, treats, and a soft towel. Place the dog on a non‑slip surface, such as a rug or mat. For anxious dogs, asking a family member to gently hold the body and offer high‑value treats can greatly improve safety and comfort.
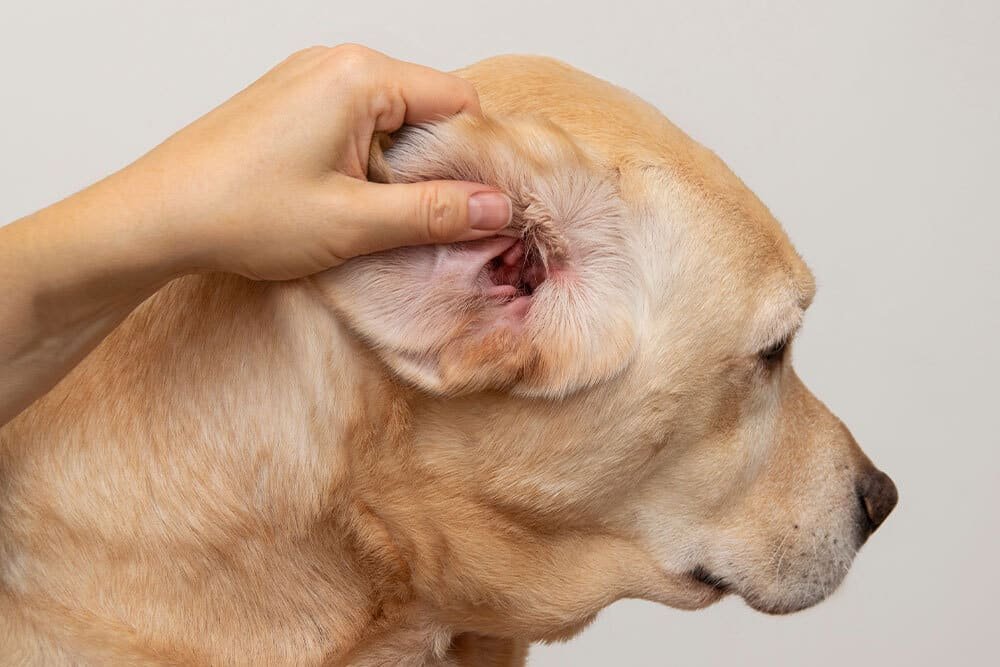
How to gently inspect the ears
Before touching the ear, let the dog sniff the hands and speak calmly. Gently lift the ear flap so the ear canal is visible without pulling. Look for redness, swelling, discharge, or a foul smell. Compare both ears for differences. Observe whether the dog pulls away, cries, or scratches more when the ear is touched; strong pain is a sign to stop and seek a vet. Avoid inserting cotton swabs or fingers deep into the ear canal.
Step‑by‑step ear cleaning routine
A calm, structured routine makes ear care safer and less stressful. Below is a simple sequence many veterinarians recommend.
- Gather supplies: vet‑approved ear cleaner, cotton balls or gauze, small towel, and treats.
- Sit your dog on a non‑slip surface and gently hold the head steady.
- Lift the ear flap so the ear canal opening is visible.
- Fill the ear canal with cleaner until it is almost full (do not touch the nozzle to the skin).
- Gently massage the base of the ear for 20–30 seconds; a squishing sound is normal.
- Allow your dog to shake the head to bring debris to the outer ear.
- Wipe away loosened wax and fluid from the visible part of the ear with cotton or gauze. Do not insert cotton swabs deep into the ear canal.
- Repeat for the other ear if needed.
- Finish with praise and a treat so ear care stays a positive experience.
How much cleaner and how often
Ear cleaner amount and frequency depend on ear size, wax level, and vet advice.
General amount
- Small dogs: about 0.5–1 mL per ear (just enough to fill the canal, not overflow)
- Medium–large dogs: about 1–3 mL per ear
General frequency (for home care, not replacing vet treatment)
- Routine maintenance: 1–2 times per month
- Floppy, allergy‑prone, or swimming dogs: weekly checks and cleaning only when dirty
- During vet‑directed treatment: follow the prescribed schedule exactly
Over‑cleaning can irritate the canal and worsen infections, so ears that look clean, dry, and comfortable do not need frequent cleaning.
Drying the ear safely after cleaning
After cleaning, gentle drying helps prevent leftover moisture from feeding bacteria or yeast.
Use cotton balls or soft gauze to blot the visible part of the ear canal and flap. Do not use cotton swabs, and never push material down into the canal. Allow the dog to shake its head, then blot again. Most vet‑approved cleaners are partly self‑drying, so extra tools like hair dryers or fans are unnecessary and can irritate the ear.
Choosing a Safe Dog Ear Cleaner
Choosing a dog ear cleaner starts with one rule: use products made for dogs’ ears only. Human ear drops or random skin products can upset the delicate ear canal. Look for a labeled "veterinary" or "pet" ear cleaner from a trusted brand. Infected or painful ears need gentle, non‑stinging, alcohol‑free formulas. When in doubt, ask a veterinarian to recommend a cleaner suited to the dog’s breed, ear shape, and infection history.
Ingredients vets usually recommend
Veterinarians usually recommend gentle, dog‑specific ear cleaners rather than homemade liquids. Common safe ingredients include:
| Ingredient type | Role in the ear | Notes |
|---|---|---|
| Saline or purified water | Base liquid | Helps rinse light debris |
| Mild surfactants (e.g., polysorbates) | Loosen wax and dirt | Formulated for ear pH |
| Drying agents (e.g., isopropyl alcohol, glycerin) | Reduce leftover moisture | Useful after baths or swimming |
| Acids (e.g., lactic, acetic, boric acid) | Support healthy ear pH | Can discourage yeast and bacteria |
| Soothing agents (e.g., aloe, chamomile) | Calm mild irritation | Support comfort only |
A vet‑approved commercial cleaner labeled for dogs is usually the safest option, especially when infection is suspected.
Products and ingredients to avoid
Certain products can worsen ear infections or cause permanent damage, so careful selection is important.
| Avoid using | Why it is unsafe |
|---|---|
| Hydrogen peroxide | Irritates ear canal and slows healing |
| Alcohol-based solutions | Sting, over-dry tissue, increase pain |
| Vinegar or undiluted acids | Can burn inflamed skin and worsen redness |
| Essential oils (tea tree, oregano, etc.) | Risk of toxicity and strong irritation |
| Human ear drops or medications | Formulated for humans, wrong dose and pH |
| Cotton swabs (Q‑tips) | Push debris deeper, risk eardrum injury |
Products with strong fragrance, dyes, or harsh antiseptics are also best avoided unless a veterinarian specifically recommends them.
Why household remedies can be risky
Many household ingredients are harsh, contaminated, or the wrong pH for sensitive ear tissue. Vinegar, hydrogen peroxide, alcohol, and essential oils can burn, dry, or irritate the canal, worsening pain and inflammation. Home mixtures also lack evidence for treating infection, may push debris deeper, and can mask symptoms, delaying proper care. In severe cases, liquids entering a damaged eardrum may even affect balance or hearing, so professional guidance is strongly recommended.
Home Remedies: What May Help, What Hurts
Home remedies can support comfort but should not replace proper veterinary treatment for true ear infections. Gentle, vet‑approved cleaners, careful drying, and anti‑itch strategies around the ear are generally safe. However, many popular ideas circulating online—such as pouring vinegar, hydrogen peroxide, alcohol, tea tree oil, or coconut oil directly into the ear—can burn the canal, worsen pain, or hide infection signs. Safe home care focuses on cleaning and monitoring; anything medicated or strongly acidic, oily, or perfumed belongs in the “do not use without a vet” category.
Mild cases: comfort-focused care
For very mild ear irritation, the goal is comfort, not curing infection. Gentle care may include keeping the ear clean and dry, using a vet-approved ear cleaner only, and limiting scratching by trimming nails and using a soft cone if needed. Offer a quiet space, reduce rough play, and use treats and calm praise during ear handling so the dog associates care with something positive. If discomfort, odor, or redness worsen, stop home care and contact a veterinarian promptly.
Remedies you should never use in ears
Some popular “natural” remedies can seriously damage a dog’s ears. Avoid putting the following directly into the ear canal unless a veterinarian gives explicit instructions:
| Never use in ears | Why it is dangerous |
|---|---|
| Hydrogen peroxide | Irritates tissue, delays healing, painful fizzing |
| Vinegar or lemon juice | Too acidic; burns inflamed skin |
| Alcohol (including witch hazel) | Stings, dries and cracks skin, increases irritation |
| Essential oils (tea tree, lavender, etc.) | Can be toxic, very irritating to delicate ear tissue |
| Garlic, onion, herbs, homemade pastes | Not sterile, may introduce infection or toxins |
| Human ear drops or leftover pet meds | Wrong drug or dose; may worsen the problem |
Only vet‑approved ear cleaners or prescribed drops should go inside the ear canal.
Safe support while you wait for the vet
While waiting for a vet appointment, focus on comfort and preventing the problem from getting worse, not on curing the infection.
- Gently wipe away visible debris from the outer ear flap with a soft cotton pad or gauze.
- Use a vet‑approved ear cleaner only if the ear is not very painful, very red, or leaking pus.
- Prevent scratching and head‑shaking with an Elizabethan collar or soft recovery collar.
- Keep the ear dry; avoid baths and swimming.
- Offer a calm environment, distraction with toys or chews, and follow any existing vet instructions or medications.
If pain suddenly worsens, balance problems appear, or foul discharge increases, contact an emergency vet immediately.
When You Must See the Vet
Ear infections can become painful and dangerous very quickly, so relying only on home care is not enough in many cases. A veterinarian is needed when infection is moderate to severe, keeps returning, or when ear shape or allergies are involved. Professional examination identifies whether bacteria, yeast, mites, or a foreign object are present, and ensures the eardrum is intact before any medication is used. Prompt vet care protects hearing and prevents chronic ear disease.
Clear signs to book an urgent visit
Urgent veterinary care is necessary when any of the following are seen:
- Strong pain: crying, yelping, growling, or pulling away when the ear is touched
- Neurological signs: head tilt, loss of balance, walking in circles, unusual eye movements
- Severe swelling or bleeding of the ear flap or canal
- Thick, bloody, or dark discharge with a very bad odor
- Fever, lethargy, or loss of appetite together with ear symptoms
Sudden worsening or symptoms in very young, senior, or chronically ill dogs should always be treated as urgent.
How vets diagnose ear infections
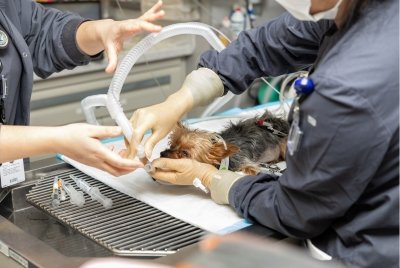
Veterinarians combine an ear exam with simple in‑clinic tests. First, the ear canal and eardrum are checked using an otoscope to look for swelling, discharge, foreign bodies, or a ruptured eardrum. Next, discharge is collected on a swab and examined under a microscope (cytology) to identify yeast, bacteria, or mites. In stubborn or severe cases, a culture test, allergy workup, or imaging (X‑ray/CT) may be used to find deeper causes.
Medical treatments only vets can give
Ear infections usually need prescription treatment to clear the cause, not just clean the ear.
| Vet treatment | What it does | When used |
|---|---|---|
| Prescription ear drops (antibiotic, antifungal, steroid) | Kill bacteria/yeast and reduce inflammation and pain | Most bacterial or yeast infections |
| Ear flush under sedation | Deeply cleans thick discharge and debris | Severe, chronic, or very painful cases |
| Oral medication (antibiotics, antifungals, steroids, pain relief) | Treats infection and swelling from inside the body | Middle‑ear infection, widespread infection, strong pain |
| Allergy treatment (diet, tablets, injections) | Controls underlying cause of repeat infections | Dogs with frequent flare‑ups |
Only a vet can safely choose the right drug and dose after checking the eardrum and identifying the organism. Self-medicating with leftover or human medicines may worsen damage or cause deafness.
Caring for Your Dog During Treatment
During treatment, ear care aims to support healing and avoid new irritation. Keep the ear area clean and dry, follow the vet’s instructions exactly, and avoid extra products unless approved. Limit rough play, tug games, and off‑leash running that may encourage head shaking. Use an Elizabethan collar or soft recovery cone if scratching is strong. Offer calm routines, gentle praise, and treats so the dog associates ear handling with safety, which makes daily care and future cleaning much easier.
Giving ear drops the stress‑free way
Many dogs dislike ear drops, so a calm routine is important. Choose a quiet space and have treats ready. Gently hold the ear flap up, avoiding painful areas. Place the nozzle just at the ear canal opening, never force it deep inside. Squeeze in the prescribed amount, then lightly massage the base of the ear for 20–30 seconds so the medicine spreads. Let the dog shake its head, then reward with praise and treats to create a positive association.
Preventing scratching and head shaking
When dogs experience severe itching or pain, they may scratch their ears or shake their heads. The most important thing to protect their ears is to "physically prevent them from touching them."
- Prevent direct scratching of the ears with an Elizabethan collar or soft collar
- Protect the ears with a cloth head cover or snood as needed
- Distract your pet with educational toys or chew toys to prevent itching from worsening due to boredom
- Keep their bedding soft and clean to create an environment where they are less likely to rub their heads hard
Giving treats when their ears are touched, for example, receiving positive experiences when they stay calm can help reduce the frequency of head shaking.
How long healing usually takes
Healing time varies by cause and severity. Mild outer ear infections may improve in 3–5 days after starting vet-prescribed drops, but medication is usually needed for 1–2 weeks. Deeper or chronic infections often require 3–6 weeks or longer of treatment. Pain and smell should steadily lessen; if signs worsen or return quickly, prompt re‑evaluation by a veterinarian is important.
Preventing Future Ear Problems
Preventing ear problems focuses on keeping ears clean, dry, and irritation‑free. Regular care reduces wax buildup, controls yeast and bacteria, and allows owners to spot changes early. Gentle cleaning after bathing or swimming, careful drying, and avoiding harsh products protect the delicate ear canal. Managing allergies, parasites, and overall skin health also lowers infection risk and supports long‑term ear comfort for dogs.
Healthy cleaning schedule by dog type
A sensible cleaning schedule depends on ear shape, coat, and lifestyle. Over‑cleaning can irritate skin, so aim for gentle, regular care instead of daily scrubbing.
| Dog type | Example breeds | How often to clean* |
|---|---|---|
| Floppy ears | Cocker Spaniel, Beagle | Every 1–2 weeks |
| Hairy ear canals | Poodle, Schnauzer | Every 1–2 weeks, plus hair checks |
| Active swimmers | Labrador, Golden | After every swim + weekly |
| Short, upright ears | Husky, Staffy | Every 3–4 weeks |
| Allergy‑prone dogs | Many breeds | As advised by vet, often weekly |
If any discharge, bad smell, or pain appears, stop routine cleaning and consult a vet* before continuing.
Bathing, swimming, and ear moisture
Ear canals often stay damp after bathing or swimming, which encourages bacteria and yeast to grow. After water play, gently dry the outer ear with a soft towel and let the dog shake. For many dogs, a vet‑recommended drying ear cleaner used after swimming helps remove trapped moisture. Avoid pouring plain water into the ears, and do not use cotton swabs inside the canal, because they may push debris deeper.
Allergies, diet, and ear health
Allergies are one of the most common hidden causes of repeated ear infections in dogs. Food allergies, environmental allergies (pollen, dust, mold), and even flea allergies can all trigger inflammation in the ear canal. Inflamed skin then traps wax and moisture, creating a perfect environment for yeast and bacteria.
| Factor | How it affects ears | What owners can do |
|---|---|---|
| Food allergies | Chronic redness, itching, recurrent infections | Discuss an elimination diet or hypoallergenic food with a vet |
| Environmental allergies | Seasonal flare‑ups, head shaking | Consider allergy meds or immunotherapy as advised by a vet |
| Poor‑quality diet | Weaker skin barrier, more inflammation | Choose balanced, complete food with good fats (omega‑3s) |
A balanced diet with omega‑3 fatty acids, good protein, and limited unnecessary additives supports healthy skin and ear canals, making infections less likely. Persistent ear problems often mean the underlying allergy and diet need to be checked, not only the ears.
Checklist for Home Ear Infection Care

A simple checklist helps avoid confusion during stressful ear problems. Key points are: confirm symptoms, clean safely, and know when to stop and call a vet.
- Observe: smell, redness, discharge, swelling, pain signs
- Check whole body: itching, paw licking, skin rash, shaking
- Prepare: vet‑approved ear cleaner, cotton pads/balls, towel, treats
- Clean only if the eardrum is likely intact and pain is mild
- Never use Q‑tips inside the canal or household liquids
- Monitor after care: improvement within 24–48 hours, not worsening
- Contact a veterinarian immediately if red‑flag signs appear
What you need in your dog first‑aid kit
A simple ear‑care section in a dog first‑aid kit helps owners react quickly and safely.
| Item | Why it matters |
|---|---|
| Vet‑approved ear cleaner | For gentle cleaning, not stinging or harsh |
| Cotton pads or gauze | To wipe away debris; safer than cotton swabs |
| Soft towel | For careful drying around the ear |
| Gloves | For hygiene and odor control |
| Timer or phone alarm | To remember ear‑drop schedules |
| Written vet instructions | To follow dosage and frequency correctly |
Keeping everything in one box near the dog’s usual care area supports calm, efficient home care.
At‑home vs vet care: quick decision guide
A simple mental checklist helps decide between home care only and seeing a vet quickly.
| Situation | At‑home care mainly OK | Vet visit strongly recommended |
|---|---|---|
| Symptoms | Mild redness, light wax, slight head shaking | Strong odor, dark discharge, obvious pain, swelling |
| Dog’s behavior | Eating, playing, normal energy | Lethargy, crying, hiding, off food |
| Timing | Symptoms improving within 24–48 hours of gentle cleaning | No improvement or worsening after 1–2 days |
| History | First mild episode, no chronic issues | Repeated infections, other health problems |
When any "vet" column applies, book a veterinary check as soon as possible rather than relying on home treatment alone.
This article provides a clear and objective explanation of the causes and symptoms of ear infections in dogs, safe home care methods and their limitations, signs that indicate you should visit a veterinary hospital, veterinarian-recommended ear cleaning procedures, how to choose care products, and prevention tips.


![My puppy won't learn to use the toilet [Keep training simple!]](https://with-my-dog.com/wp-content/uploads/2021/12/dog-g33cd6bf6a_1920-150x150.jpg)


![Dog Diet [Food]](https://with-my-dog.com/wp-content/uploads/2021/10/dog-g9601cd196_1920-300x199.jpg)
![[Popular dog food rankings] Recommended dog food and how to choose it](https://with-my-dog.com/wp-content/uploads/2021/10/入れ替え_5枚目-300x200.jpeg)